LCD Displays (GPIO)
https://create.arduino.cc/projecthub/najad/interfacing-lcd1602-with-arduino-764ec4
Introduction
In this getting started with LCD module tutorial, we are going to learn interfacing an LCD module with popular development boards like Arduino Nano, Uno, Mega, and Leonardo.

Hardware Used
16x2 LCD module
Arduino Mega
Libraries Used
LiquidCrystal Library
A Little Bit About LCD Modules...
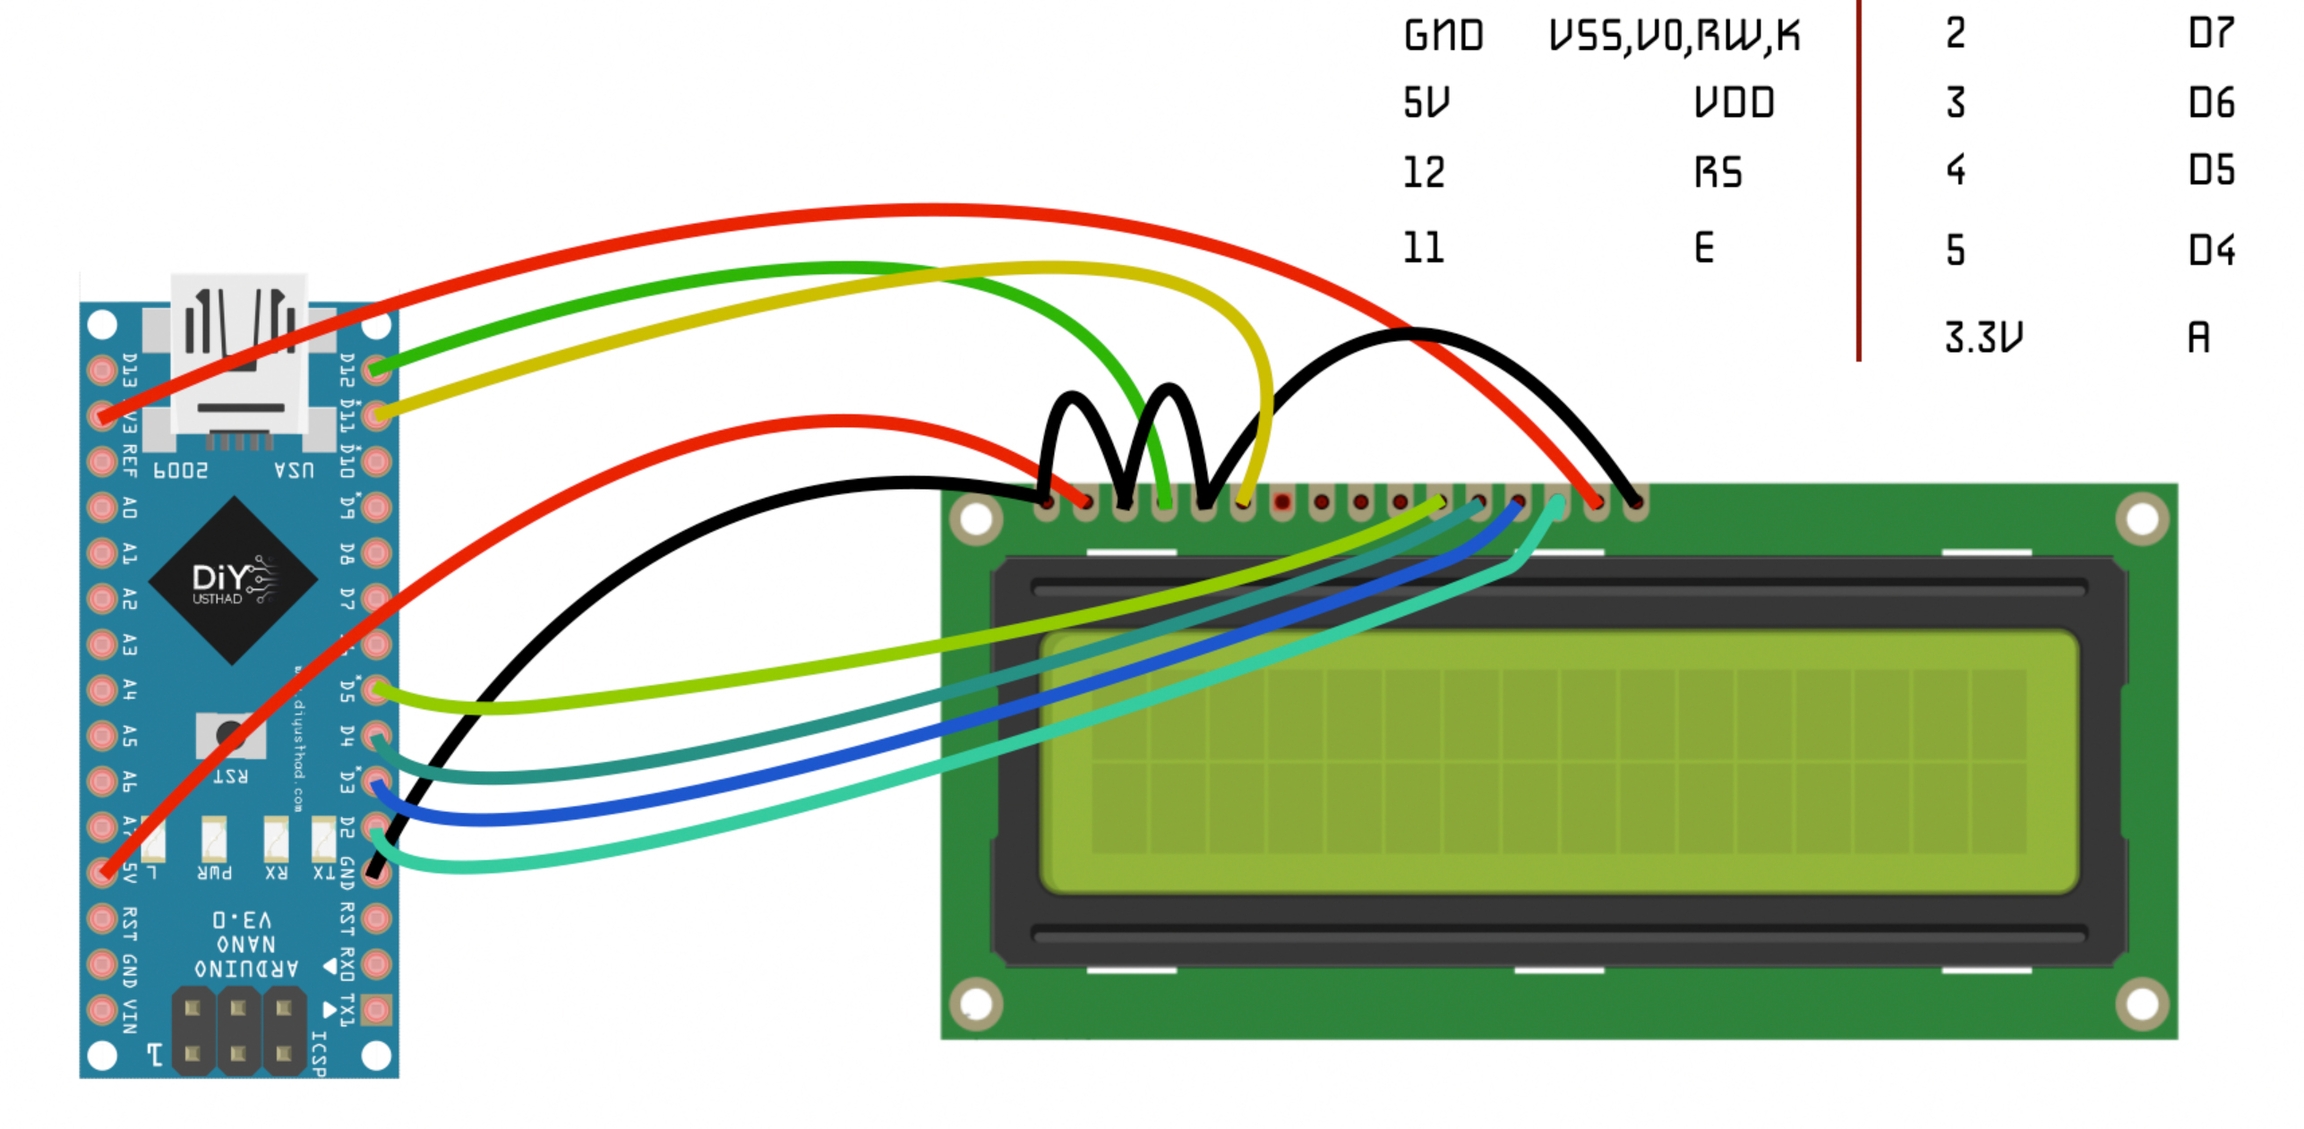
LCD modules are coming in different colors and sizes with a different number of displayable characters. the most commonly used one is LCD1602 which can display 16 characters in each line, that is a total of 32 characters. Some other sizes are,
LCD1604 - 16 char / 4 line
LCD2004 - 20 char / 4 line
LCD1602 - 16 char / 2 line
LCD1601 - 16 char / 1 line etc...

We can use the Library in 4 or 8 bit mode. In this tutorial we will use it in 4 bit mode, or we will just use 4 of the 8 data pins.
PIN Description


We are interfacing the LCD1602 with Arduino using the data pins of the LCD module. The same code and circuit will work for all Arduino and compatible boards.Connect the circuit as shown in the below diagram.
Circuit


First connect the
ground
of Arduino to theVSS
of the LCD.Then connect the
V0
of the LCD to theground
for full contrastThen connect
RW
to theground
for selecting write modeThen connect
K
, which is theground
of backlight LED also to the ground.Then connect the
5V
of Arduino to theVDD
of the LCD module.Then connect the
digital pin 12
of Arduino to theRS
of LCD module.Then connect the
digital pin 11
of Arduino to theE
of LCD module.Then connect the
digital pin 5
of Arduino to theD4
of LCD module.Then connect the
digital pin 4
of Arduino to theD5
of LCD module.Then connect the
digital pin 3
of Arduino to theD6
of LCD module.Then connect the
digital pin 2
of Arduino to theD7
of LCD module.And finally connect the
3.3V
of Arduino to theA
of LCD which is the anode of backlight LED.
Code
//www.diyusthad.com
#include <LiquidCrystal.h>
const int rs = 12, en = 11, d4 = 5, d5 = 4, d6 = 3, d7 = 2;
LiquidCrystal lcd(rs, en, d4, d5, d6, d7);
void setup() {
lcd.begin(16, 2);
lcd.print("First line");
lcd.setCursor(0,1);
lcd.print("Second line");
}
void loop() {
}
Schematics

Alternatively, to make a variable contrast and only require a 5V output

Autoscroll
This example sketch shows how to use the autoscroll() and noAutoscroll() methods to move all the text on the display left or right.
autoscroll()
moves all the text one space to the left each time a letter is added
noAutoscroll()
turns scrolling off
This sketch prints the characters 0
to 9
with autoscroll off, then moves the cursor to the bottom right, turns autoscroll on, and prints them again.
#include <LiquidCrystal.h>
const int rs = 12, en = 11, d4 = 5, d5 = 4, d6 = 3, d7 = 2;
LiquidCrystal lcd(rs, en, d4, d5, d6, d7);
void setup() {
lcd.begin(16, 2);
}
void loop() {
// set the cursor to (0,0):
lcd.setCursor(0, 0);
// print from 0 to 9:
for (int thisChar = 0; thisChar < 10; thisChar++) {
lcd.print(thisChar);
delay(500);
}
// set the cursor to (16,1):
lcd.setCursor(16, 1);
// set the display to automatically scroll:
lcd.autoscroll();
// print from 0 to 9:
for (int thisChar = 0; thisChar < 10; thisChar++) {
lcd.print(thisChar);
delay(500);
}
// turn off automatic scrolling
lcd.noAutoscroll();
// clear screen for the next loop:
lcd.clear();
}
Blink
This example sketch shows how to use the blink() and noBlink() methods to blink a block-style cursor.
#include <LiquidCrystal.h>
const int rs = 12, en = 11, d4 = 5, d5 = 4, d6 = 3, d7 = 2;
LiquidCrystal lcd(rs, en, d4, d5, d6, d7);
void setup() {
// set up the LCD's number of columns and rows:
lcd.begin(16, 2);
// Print a message to the LCD.
lcd.print("hello, world!");
}
void loop() {
// Turn off the blinking cursor:
lcd.noBlink();
delay(3000);
// Turn on the blinking cursor:
lcd.blink();
delay(3000);
}
Cursor
#include <LiquidCrystal.h>
const int rs = 12, en = 11, d4 = 5, d5 = 4, d6 = 3, d7 = 2;
LiquidCrystal lcd(rs, en, d4, d5, d6, d7);
void setup() {
// set up the LCD's number of columns and rows:
lcd.begin(16, 2);
// Print a message to the LCD.
lcd.print("hello, world!");
}
void loop() {
// Turn off the cursor:
lcd.noCursor();
delay(500);
// Turn on the cursor:
lcd.cursor();
delay(500);
}
Custom Characters
It is also possible to write a custom characters to the LCD. It supports up to 8 characters of 5×8 pixels.
We can specify the appearance of each character by an array of 8 bytes. In the source code below we can notice how we can specify the appearance of the character by changing the 0 into 1 which represents the 5×8 pixels. In the setup we have to create the custom character using the createChar() function.
The first parameter in this function is a number between 0 and 7, or we have to reserve one of the 8 supported custom characters. The second parameter is the name of the array of bytes. We write the custom character to the display using the write() function and as a parameter we use the number of the character.
#include <LiquidCrystal.h>
const int rs = 12, en = 11, d4 = 5, d5 = 4, d6 = 3, d7 = 2;
byte slash[8]= { // Array of bytes
B00001, // B stands for binary formatter and the 5 numbers are the pixels
B00010,
B00100,
B01000,
B10000,
B00000,
B00000,
B00000,
};
LiquidCrystal lcd(rs, en, d4, d5, d6, d7);
void setup() {
// set up the LCD's number of columns and rows:
lcd.begin(16, 2);
// Create a custom character for use on the LCD. Up to eight characters of 5x8 pixels are supported
lcd.createChar(7, slash);
}
void loop() {
for(int i=0;i<=15;i++) {
lcd.setCursor(i,0); // Sets the location at which subsequent text written to the LCD will be displayed
lcd.write(7); // Writes a character to the LCD
delay(1000); // 1 second delay
lcd.clear(); // Write a character to the LCD
}
}
You can write a filled in block with character 255
void loop() {
for(int i=0;i<=15;i++) {
lcd.setCursor(i,0); // Sets the location at which subsequent text written to the LCD will be displayed
lcd.write(255); // Writes a character to the LCD
delay(1000); // 1 second delay
lcd.clear(); // Write a character to the LCD
}
}

Find the symbol's binary address and print like this:
void loop() {
for(int i=0;i<=15;i++) {
lcd.setCursor(i,0); // Sets the location at which subsequent text written to the LCD will be displayed
lcd.print((char) B00100011);
delay(1000); // 1 second delay
}
}
Further Reading
Last updated
Was this helpful?