LogoLogo
Terminal
  • Attic Lab
  • Getting Started
  • Crest Gold
  • Crest Silver
  • Videos on Computation
  • PI PICO (CIRCUITPYTHON)
    • Getting Started
    • Pin Out Diagram
    • Breadboards
    • 1. Led Blink
    • 2. RGB
    • 3. OLED
    • 4. Sensors
    • 5. Wifi
    • 6. Servos
  • Arduino
    • Getting Started
    • Pin Out Diagrams
      • Mega2560 R3
    • Programming
      • Arduino C - Cheat Sheet
    • Buttons
      • Momentary Switches
    • Display
      • LEDs
      • 7 Segment Displays
      • LCD Displays (GPIO)
      • LCD Displays (SPI)
      • OLEDs
    • Communication
      • Antenna Theory
      • Lora
      • Wifi
        • Boards
    • Project Ideas
    • Motion
      • DC Motors
      • Servo Motors
      • Stepper Motors
  • Microsoft Office
    • Word
    • Powerpoint
    • Excel
  • The Terminal
    • Basics
    • Cheat Sheet
    • Games
      • Level 1 - Bashcrawl
      • Level 2 - Bandit
  • TinkerCad
    • Gallery
    • Getting Started
    • Basic Operations
    • Basic Skills
    • Projects
      • Locking Container
  • Python
    • Hello World
    • Turtle Graphics
      • Strings in Turtle Graphics
      • Cheat Sheet
    • Variables
    • Loops
    • If Statements
    • Functions
    • Games
      • Pong
  • Raspberry Pi
    • Setup
      • Changing The Hostname
      • Headless Setup
      • Kiosk Mode
    • Remote Connections
    • Displays
      • Memory
        • External HD
      • HyperPixel 4.0
  • Ultimaker 3D Printing
    • The Thingiverse
    • Preparing the File
    • Printing
    • Calibration Prints
    • Print Set
  • Fusion 360
    • Getting Started
    • Design Tutorials
      • Tweezers
      • Mars Rover Wheel
    • Surface Modeling
  • Electronics
    • References
    • Antenna Theory
    • LoRa
  • PCB Milling
    • FlatCam
    • Candle
    • PCB Milling
  • Projects
  • Projects
    • Star Map Necklace
    • Ideas Respository
  • Latex
    • What is LaTeX?
    • Getting Started
    • Structure
    • Page Size & Margins
    • Styling
    • Images
    • Lists
    • Tables
    • Mathematics
      • Superscript and Subscripts
      • List of Symbols
      • Fractions and Binomials
      • Integrals, Sums & Limits
    • Colors
  • Web Development
    • The Internet
    • Intro to HTML
    • Basic Elements
    • Basic Styling
Powered by GitBook
On this page
  • Creating a simple table in LATEX
  • Adding borders
  • Captions, labels and references

Was this helpful?

  1. Latex

Tables

PreviousListsNextMathematics

Last updated 3 years ago

Was this helpful?

Creating a simple table in LATEX

Below you can see the simplest working example of a table

\begin{center}
\begin{tabular}{ c c c }
 cell1 & cell2 & cell3 \\ 
 cell4 & cell5 & cell6 \\  
 cell7 & cell8 & cell9    
\end{tabular}
\end{center}

The tabular environment is the default LATEX method to create tables. You must specify a parameter to this environment, in this case {c c c}. This tells LATEX that there will be three columns and that the text inside each one of them must be centred. You can also use r to align the text to the right and l for left alignment. The alignment symbol & is used to specify the breaks in the table entries. There must always be one less alignment symbol in each line than the number of columns. To go to the next line of your table, we use the new line command \\. We wrap the entire table inside the center environment so that it will appear in the center of the page.

Adding borders

The tabular environment is more flexible, you can put separator lines in between each column.
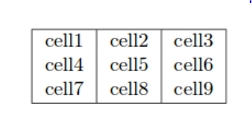
\begin{center}
\begin{tabular}{ |c|c|c| } 
 \hline
 cell1 & cell2 & cell3 \\ 
 cell4 & cell5 & cell6 \\ 
 cell7 & cell8 & cell9 \\ 
 \hline
\end{tabular}
\end{center}

You can add borders using the horizontal line command \hline and the vertical line parameter |.

  • { |c|c|c| }: This declares that three columns, separated by a vertical line, are going to be used in the table. The | symbol specifies that these columns should be separated by a vertical line.

  • \hline: This will insert a horizontal line. We have included horizontal lines at the top and bottom of the table here. There is no restriction on the number of times you can use \hline.

Below you can see a second example.

\begin{center}
 \begin{tabular}{||c c c c||} 
 \hline
 Col1 & Col2 & Col2 & Col3 \\ [0.5ex] 
 \hline\hline
 1 & 6 & 87837 & 787 \\ 
 \hline
 2 & 7 & 78 & 5415 \\
 \hline
 3 & 545 & 778 & 7507 \\
 \hline
 4 & 545 & 18744 & 7560 \\
 \hline
 5 & 88 & 788 & 6344 \\ [1ex] 
 \hline
\end{tabular}
\end{center}

Captions, labels and references

You can caption and reference tables in much the same way as images. The only difference is that instead of the figure environment, you use the table environment.

Table \ref{table:data} is an example of referenced \LaTeX{} elements.

\begin{table}[h!]
\centering
\begin{tabular}{||c c c c||} 
 \hline
 Col1 & Col2 & Col2 & Col3 \\ [0.5ex] 
 \hline\hline
 1 & 6 & 87837 & 787 \\ 
 2 & 7 & 78 & 5415 \\
 3 & 545 & 778 & 7507 \\
 4 & 545 & 18744 & 7560 \\
 5 & 88 & 788 & 6344 \\ [1ex] 
 \hline
\end{tabular}
\caption{Table to test captions and labels}
\label{table:data}
\end{table}

Creating tables in LATEX can be a bit tricky sometimes, so you may want to use the online tool to export LATEX code for tabulars. The File > Paste table data option lets you copy and paste data from spreadsheet applications.

TablesGenerator.com
Create LaTeX tables online – TablesGenerator.com
Logo