The 16×2 LCD screen has 2 lines and it can display up to 16 characters per line. 16×2 means two lines and each line has 16 columns, 32 characters in total. The 16×2 LCD screen can be programmed using an Arduino microcontroller board with the liquid crystal library to display custom text, numbers, and special characters.
This page looks at the RGB LCD made by Grove which can have any color backlight and allows for custom characters to be displayed. Grove do make monochrome LCDs too,
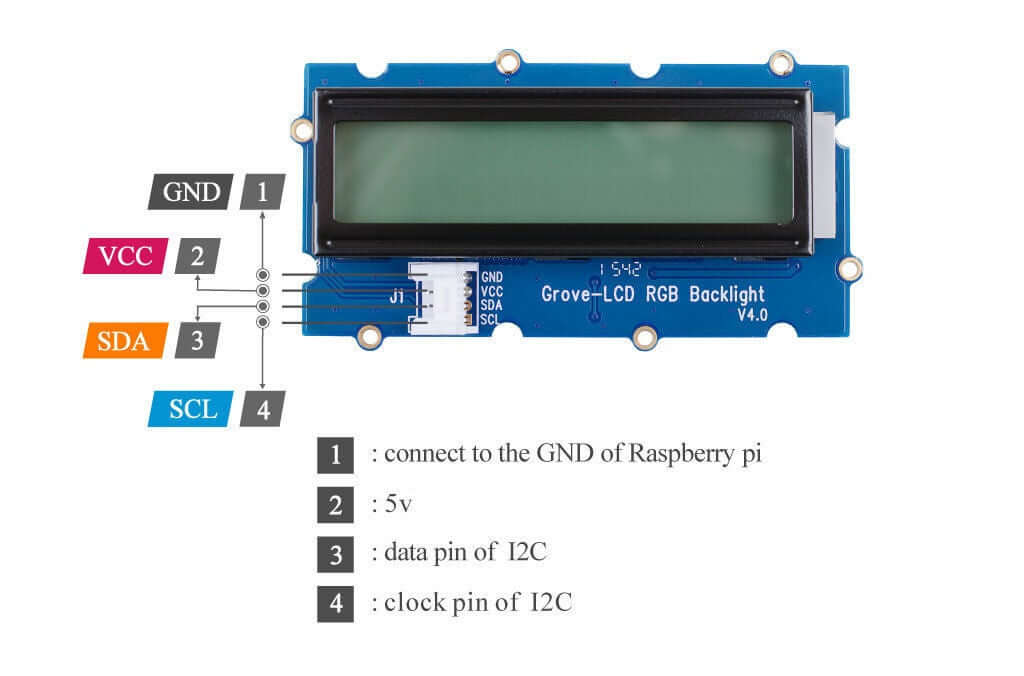
Traditionally, 16×2 LCD requires up to 10 I/O pins to display which comes with monocolor backlight, but with RGB backlight requires an extra 3 pins to control the color which will take up a lot of I/O pins on the main control board. Done with tedious monocolor backlight? With the help of Grove I2C connector, only 2 signal pins and 2 power pins are needed. You don’t even need to care about how to connect these pins. Just plug it into the I2C interface on the Arduino.
This Grove 16×2 LCD comes with a full-color backlight. High contrast and ease of use makes it a perfect I2C 16×2 LCD with Arduino and Raspberry Pi. This enables you to set to any color via the simple and concise Grove interface.
Grove – 16×2 LCD RGB Backlight supports user-defined characters as well! Want to get a love heart or some other foreign characters? Just take advantage of this feature and design it!
Connection
The Grove LCD comes with a connector than is not compatible with the Arduino pins so you will need to make your own connection using jumper leads and perhaps terminal blocks
Library
The library used to run the display is specific to the manufacturer Grove but should be included in the Arduino IDE
Examples
More examples can be found in the library's repository.
Hello World
#include <Wire.h>
#include <rgb_lcd.h>
rgb_lcd lcd;
const int colorR = 255;
const int colorG = 0;
const int colorB = 0;
void setup() {
// set up the LCD's number of columns and rows:
lcd.begin(16, 2);
lcd.setRGB(colorR, colorG, colorB);
lcd.display();
// Print a message to the LCD.
lcd.print("hello, world!");
delay(1000);
}
void loop() {
// set the cursor to column 0, line 1
// (note: line 1 is the second row, since counting begins with 0):
lcd.setCursor(0, 1);
// print the number of seconds since reset:
lcd.print(millis() / 1000);
delay(100);
}
Auto Scroll
#include <Wire.h>
#include "rgb_lcd.h"
rgb_lcd lcd;
void setup() {
// set up the LCD's number of columns and rows:
lcd.begin(16, 2);
}
void loop() {
// set the cursor to (0,0):
lcd.setCursor(0, 0);
// print from 0 to 9:
for (int thisChar = 0; thisChar < 10; thisChar++) {
lcd.print(thisChar);
delay(500);
}
// set the cursor to (16,1):
lcd.setCursor(16, 1);
// set the display to automatically scroll:
lcd.autoscroll();
// print from 0 to 9:
for (int thisChar = 0; thisChar < 10; thisChar++) {
lcd.print(thisChar);
delay(500);
}
// turn off automatic scrolling
lcd.noAutoscroll();
// clear screen for the next loop:
lcd.clear();
}
Custom Characters
#include <Wire.h>
#include "rgb_lcd.h"
rgb_lcd lcd;
// make some custom characters:
byte heart[8] = {
0b00000,
0b01010,
0b11111,
0b11111,
0b11111,
0b01110,
0b00100,
0b00000
};
byte smiley[8] = {
0b00000,
0b00000,
0b01010,
0b00000,
0b00000,
0b10001,
0b01110,
0b00000
};
byte frownie[8] = {
0b00000,
0b00000,
0b01010,
0b00000,
0b00000,
0b00000,
0b01110,
0b10001
};
byte armsDown[8] = {
0b00100,
0b01010,
0b00100,
0b00100,
0b01110,
0b10101,
0b00100,
0b01010
};
byte armsUp[8] = {
0b00100,
0b01010,
0b00100,
0b10101,
0b01110,
0b00100,
0b00100,
0b01010
};
void setup() {
lcd.begin(16, 2);
#if 1
// create a new character
lcd.createChar(0, heart);
// create a new character
lcd.createChar(1, smiley);
// create a new character
lcd.createChar(2, frownie);
// create a new character
lcd.createChar(3, armsDown);
// create a new character
lcd.createChar(4, armsUp);
#endif
// set up the lcd's number of columns and rows:
lcd.setCursor(0, 0);
// Print a message to the lcd.
lcd.print("I ");
lcd.write((unsigned char)0);
lcd.print(" Arduino! ");
lcd.write(1);
}
void loop() {
// read the potentiometer on A0:
int sensorReading = analogRead(A0);
// map the result to 200 - 1000:
int delayTime = map(sensorReading, 0, 1023, 200, 1000);
// set the cursor to the bottom row, 5th position:
lcd.setCursor(4, 1);
// draw the little man, arms down:
lcd.write(3);
delay(delayTime);
lcd.setCursor(4, 1);
// draw him arms up:
lcd.write(4);
delay(delayTime);
}